Sunday, March 31, 2013

The Easter Bunny Arrived

Well I am on holidays for a few weeks now to coincide with the school holidays, and I have been sitting back sipping a few sherberts with the family over the last few days and that will continue for the next few days.  Because of this I have not looked at any modelling in the shed. It has been great catching up with one of my Brother-in-law and my nieces and nephews and their spouses and families. No doubt I will catch up with more in the next week. It is just a great time.
 
As mentioned above, although I did get my AMRM mag about 10 days back, and I was stirred onto doing some modelling because of some of the articles in that issue, but I have decided that I will just sit back and de-stress from work, at least this first week of my holidays.  Plenty of things to do with the kids.  Go to the beach, kick the football, have a swim in the pool, go for a run with Paige in the morning in preparation for the school cross country in 3 weeks.  And I have a few railway related mags to catch up on.
 
So this morning the Easter Bunny delivered some chocolate to the kids and myself and the wife. It’s amazing how that bugger gets inside the house! Well I suppose it is the same way that ants and other insects get in.
 
Happy Easter everyone.

Sunday, March 24, 2013

About to Reach 100,000 Hits

Checking my blog counter, it is about to roll over to 100,000 hits since the blog has been active. To me that is a great achievement. I’d like to thank those that visit regularly or even just occasionally and follow my posts as well as use the tracking feature on the other blogs that I follow and work out which of these other blogs have been updated.  I know I use that to see what is happening in the Blogosphere.
 
Monday night this week we found out that Old Mike had taken a fall and had broken his wrist and his knee cap and was in hospital. Our thoughts are with him for a quick mend so he can re-join our fortnightly sessions. 
 
Tuesday this week, two car loads of guys went to the Buy and Sell at the Union Pacific Model Railway Club at Holland Park West. Not many people there, a very small amount of Australian outline gear and I think everyone in our group besides me walked away with something.  Shelton was the winner with two VR T class locos for a great price.
 
Thursday this week, PK and myself made our way down to the Anzac Square Building in the city to just perve through the window of a new shop that is opening in the city. It will be dedicated to Model Railways. They were still setting up the stock and were planning to open on Saturday morning. I intend to make my way back down to the shop one day this coming week to have a closer inspection inside.
 
Friday this week Geoff arranged a modelling night so we went over there for a beer, some banter and some beaut modelling.
 
I took along my 73 classes to do some more work. I started pulling apart the second with an aim to install an NCE Z14SR decoder in it. When I looked at this in detail, I though damn that is small. It has two small pads on the decoder where you must solder the traditional Green and Purple wires for the third and fourth function outputs. They were so small I could not see them. Well I quickly decided that I think I will not be using that decoder on that 73 and will resort to the use of a N14SR decoder when my local hobby shop eventually gets some more in.  When I took the top of this loco as opposed to 7304 I had already decodered up, this loco on the light boards at each end, has a blob of hot melt glue to assist keeping the 5 wires secure on the light board.  My 7304 did not have this and probably explains why the wires came off on one of my light boards and now on one end, the number board lights will not work.
 
My topless Auscision 7305 before I started cutting wires.

I have removed the provided circuit board which I discard to the spares box after cutting the track pick up wires and the motor wires.  I also remove the five pin plug used to connect to the light boards at each end.

This photo shows the plug that connects the 5 red and 5 black wires from the end light boards to the circuit board cut off - the plug is visible at the top of the photo.  I also cut off the top lug on the sheet of styrene that protects the wires from rubbing against the flywheel below.  I then use only one screw in the bottom (in this photo) to retain the styrene board in place.

I soldered the rail pickups together and tinned the motor leads ready for installation to the decoder. Unfortunately the boss from crook on Saturday morning, so I had to do the pickup and drop off of the kids at two parties back to back. I had planned to go from the second party to Ray’s shop, but I forgot. When I got back home, I looked at the clock and damn! 4:00pm and the shop would have been closed. I will try and pick up some decoders next Thursday before the long weekend.

Today I just could not get motivated to go to the shed.  My daughter wanted to do homework instead of paint some baseboard so I left it again until she is in the mood.

Sunday, March 17, 2013

73 Class Progress

Not much to talk about this week.  On Monday night this week I have spent some time experimenting with the LED light board out of the Auscision 73 Class loco. I first ran the LED light board with two AA batteries.  On Tuesday night after a suggestion from Greg B, I ran the LED light board from a 9V battery. So I was happy with the results.  This helped me decode what each of the 5 wires was to be used for.

I had posted on the aus_model_rail yahoo group a hand drawn picture, but it is included below slightly better drawn in MS-WORD.
 
Today I wired up the front LED light board of the loco of one my 73 class locos.  I already had it running smoothly with an NCE N14SR decoder.  I had a heck of a time with the red wires coming off the LED light board.  So I couldn't get it functioning successfully.  I think I might have applied too much heat and my number board lights no longer light.  At least the white and red marker lights work well.
 
So I then turned my attention to the rear LED light board of the 73 class.  I installed a TCS FL4 4-function light only decoder.  I wired this up to the rear LED light board and its 5 black wires.  This works like a bought one!  I will try my luck and see if I can purchase a new LED light board as a spare part.
 
I still have to change a few settings on the TCS decoder to have it working on the correct function keys, but I'll do that this week sometime.  I will have the NCE decoder set to short address 3 and the TCS decoder to short address 4.  I will then set these two decoders up to the same 4 digit address of the 73 class.  That way I can change each decoder individually, by toggling back and forth between the short address and long address.  That allows me to then still consist the 73 with another loco - maybe even another 73 class.
 
Yesterday I spent a small amount of time in the shed, but it was just too steamy. I had sweat pouring off me. I mixed up about four small batches of plaster and went over a couple of areas to ensure that the plaster was not too weak in a couple of areas.  I just had to call it quits and come back up and watch the motor racing on TV in the house.

I had originally planned to go to the shed today with my daughter so she could help me paint the plaster base for a small area that was plastered over the last few weeks.  She was enthusiastic during the week, but ended up doing some homework.  There is always next week.

Sunday, March 10, 2013

Normal Services have been Resumed

Today I went down the shed and believe it or not, I did some more plastering.  I stated at North Street backing onto the rear of Cassino Station and plastered up to Convent Lane.  From Convent Lane I plastered to Wiangarie Street.  Then from there past a laneway which will be covered in grass and then onto Kyogle Street.  From there I plastered up to Runnymede Street.  In all 11 feet of plastering, but it was only about 1 foot deep.  My plaster bag is almost empty, so I will have to head off pretty soon for another 20kg bag of casting plaster from Bunnings.
 
So the area behind the station now looks all white.  Over the next few months I will be colouring this area a bit and installing a basic dirt and grass covering.  Actually I will start at the Richmond River and work my way all the way to Runnymede Street.  This is over 20 feet of scenicing that has to be undertaken.  Next job will then be to install a few fences separating the various blocks or land.
 
Once this is done, I can remove the masking tape from the track and the various layers of paper towel to prevent plaster getting on things that it shouldn't.  I can then clean the track and trains will then be able to run again free of obsticles.
 
This week as previously mentioned in a previous post my 73 class locos arrived from Auscision Models on Monday. On Monday night I installed an NCE N14SR decoder in one loco and am waiting to get another decoder from the LHS for the second loco. Although I do have a Z14SR decoder available for the other loco.  There certainly is not much room in there for two decoders as I need two decoders to cover all the lighting functions available.  I also have another Club member who wants me to decoder up his 73 class loco once I get mine working satisfactorily.
 
We went to Lefty’s on Tuesday for our fortnightly meeting.  He allowed me to a perform a short test run of the 73 on his layout for the other Tuesday Nighters.  Again another great and interesting night.
 
Saturday (yesterday) was club day. I actually won the raffle for a change and now have a nice storage case (actually two) to show for it. While there, I received 4 Eureka terminal cars to be rewired from another of our Club members. Something to keep me out of the pub over the next few weeks.

Getting back to the 73 class locos, I have requested some assistance via the NCE-DCC yahoo group. I have received a couple of replies and I will pursue one of the responses further.  See ya next week.

Wednesday, March 6, 2013

The 73's have Arrived

On Monday morning I received a phone call from the boss at home advising that a package from Auscision Models had arrived. So I left work reasonably early at 4:00pm and made my way home. Upon my arrival I unpacked the models and took then straight down to the shed to run them on DC. They ran very smoothly and I was most impressed with them. I then gathered some tools together:- Wire Cutters, Soldering Iron, Solder, Tweezers, DCC wire, two decoders, a DC throttle, a multi-meter, 2 x AA batteries in a battery holder, a 1K ohm resistor and a small 3mm white LED, and then spent some time with the family over dinner.
 
After dinner I read the instructions that came with the models. I used the foam lid from the box as my work area, and proceeded to disassemble the model by removing the KD’s and the chassis. At last access to the internal wiring. I had a close and look and thought that I will be able to install the motor decoder quite easily and then look at my additional decoder for the rest of the lights. I removed the circuit board and cut off the front headlight board. It was very easy to remove the two red wires and the two black wires from the wheel pickups and then remove the red and black wires from the motor and connect them to the orange and grey wires from the decoder. I chose an NCE N14SR decoder as it had 4 function outputs.  However, when I connected them red to orange and black to grey the loco ran in reverse. What a stupid decision by the Chinese designers.
 
My plan is to use the N14SR decoder to power the motor and the lights at one end, and a 4 function FL4 for the other end.  Maybe a Z14SR decoder may have been a better options as it is about half the size of the N14SR decoder.
 
Then my attention turned to the front light board that I removed. I decided to try and workout what wire was what. I numbered the 5 wires from right to left. That is correct right to left when viewed from the rear, with the lights facing forward away from me. After some trial and error, I worked out that when my 3V battery with its 1K ohm resistor was connected black to wire 1 and red to wire 4, we had white marker lights. When I connect the wires in the reverse order, black to wire 4 and red to wire 1, we had red marker lights. Immediately I thought that was not good. Again a stupid decision by the Chinese designers. It appears that these two LED’s were wired back to back on the little light board at the front and rear of the loco. I would have thought that it would have been smarter to do all the magic back on the circuit board in the loco and run one extra wire to the light board at the front or rear of the loco. Sure that might have made one of the switches into a DPDT switch, or put a fourth switch in. That way it would be easier to DCC the loco eventually.  I'd bet that there will end up being more DCC versions than DC versions eventually.
 
When you run the black wire from the 3V battery to wire 1 and the red wire to wire 5, we get the headlight lighting up. When you run the black wire from the battery to wire 2 and the red wire to wire 3, we get the number boards being lit.
 
So with my small brain, I immediately wondered if it was electrically possible to use two decoders to get the red and white marker lights working alternately or even similtaneously. Can I connect the blue wire from decoder 1 to the wire 1 and the green wire to wire 4. At the same time can I connect the blue wire of decoder 2 to wire 4 and the green wire to wire 1. Of Course both green wires will have a 1K ohm resistor installed on them. Does this proposed implemetation cause issues?  So my plan is when I turn on function 1 in the first decoder, I get the white lights. When I turn on a remapped say function 3 (for example) on the second decoder, I get red lights. So I ask the vast collection of electrical gurus in this WWW thing “Will this work, or will it cook two decoders?”
 
I can be happy with controllable headlight, number boards and white marker lights with no red marker lights at each end, but if I can I would like to get them working as well.
 
I just feel this is poor planning for the DCC world in which we now live. Boo to those Chinese designers.
 
I had planned on taking some photos of my dissassembed 73 tonight, but cannot be bothered, I've had a bad day at work working with imbeciles, late buses and I am totally spent.  Last night I took the 73's to Lefty's place for Tuesday Nighters and ran it on his layout.  It ran very smoothly in DCC mode except for being in reverse.  I will fix up the two wires to the motor on Friday night and further investigate the lighting controls.

Sunday, March 3, 2013

Simpsons Lane Abutments

As someone  great once said “Rain Rain P155 0ff!...” Aren’t we sick of this damn rain in Queensland! Fortunately I am much better off than many poor sods around the State.  As it was raining cats and dogs on Saturday I could not even leave the house to get to the shed. However, today is has now become just showers and I think i saw the sun trying to peak through at least twice this afternoon. So after lunch I made my way down to the Shed for about an hour.
 
First task was to do something for Paul - one of our Tuesday Nighters.  He was after copies of yard layouts of Clapham Yard, Park Road and South Brisbane.  He requested these during the week.  I had these down the shed somewhere.  I eventually found them.  I will provide a copy for him on Tuesday Night this week.
 
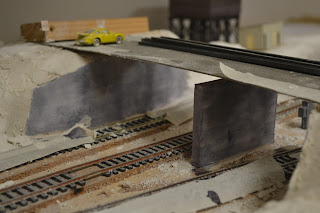
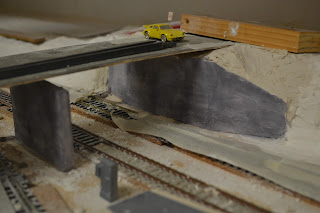
The next task was to see how I could cut in my two Simpsons Lane bridge abutments that I cast over the last 2 weekends. So after roughly working out what had to be cut away, I cut the terrain back to allow placement of the abutments into the scenery.  Then I cut off the wings on each side of the abutments. I used a cut off disk in my Dremel and bot did it produce some plaster dust.  So after placing the abutments I then whipped up a batch of plaster – funny that! I then blended the abutments in with the surrounding terrain.

At this stage I am very happy with how they have come out. I then went back to the house to watch the V8 races.  I had a plan to slightly stain the abutments next weekend with a very light stain so they looked like concrete.  However, when I went back down to the shed to get some photos for this blog update and decided to stain the abutments then and there.

Here are a few photos.
A view of the overbridge looking southwards.

A helicopter view looking north.  A fair bit of plaster dust can be seen laying around in this photo.

Looking north again.  This time in the background you can see my secret mixture of metho and ink pad refill.
A close up of the west abutment.

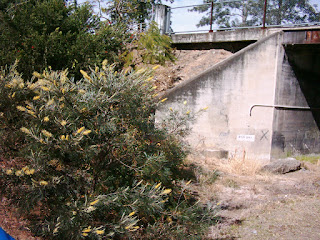
Does this photo look familiar?  Many years back in 2004, I took this photo which is what the above model photo will hopefully eventually look like.  If I can ever put together that Ian Phemister kit I know where it will be going.
A view of the real central pier also taken in 2004.  The pack platform road was ripped up around 1991.

The wing of the east side abutment.
I do have some I-beam Plastruct that will go on top of my abutments and support the road.  Again a job for next weekend.
 
Tuesday this week we will be visiting Lefty & Son’s place to check on progress. There is nothing like making him feel guilty and spur him on to create more progress.