Sunday, January 27, 2013

Rain Rain Go Away

This week there has been very minimal activity in the shed. The only time I was in there was on Monday night when young Keith from our Club visited in the evening. We call him young Keith as we have two Keiths. Old Keith doesn’t get around much any more – except to the Club on a Wednesday and Saturday so he can sneak in a cream biscuit or two into his diet. So back to Monday night, I did a tour of the layout and we spent many hours discussing the way I constructed my layout and we also spoke about the Clubroom HO layout which is being built in our 12m x 12m HO extension. Young Keith and Old Keith for that matter are two of the heavily involved builders. They are doing a pretty good job.
 
Tuesday Night had a great turn up for the scheduled Tuesday Nighters’ meeting at Peter’s place. We took the opportunity to check out the changes Peter had done on the layout. It looks like his revamped branch is operational. I see that he has also installed a series of termite mounds. Peter and I discussed this on our way back from the Armidale convention this year. There are many items in nature that you never see on a layout, which I would think would be reasonably simple to add, but by having them, they add lots of interest and create great discussion points. As usual, the scenery work that Peter has done just has to be seen to be believed. Just really great work. We then adjourned down stairs and the conversations flowed, the modelling items were passed around, and a great time was had as usual.  Peter also had some issues with his HUB set, but I provided him a copy of some of the ways other HUB set owners have addressed some of thissues thanks to the various online forums. Discussions also involved Geoff’s planned new home layout in his garage. I feel this will be a very nice layout to operate on, given his previous modelling efforts.
 
Friday Night was a visit to Geoff’s for a modelling night in his garage with the crew. I read my email on Friday morning at work, advising of a call to arms at Geoff’s from 7:00pm that night. Upon arriving home from work, the boss granted me a leave pass so I was one of the 5 visitors that attended Geoff’s. There is a good update with a few photos over on Brendan’s Blog – Gundagai Model Railway Layout. I think everyone was firing on all cylinders. It was quite wet, but given that Geoff is not that far away, I went along. I spent the night adding the last lot of stumps to my case store that I have been building on and off for about 18 months. I then started staining the stumps that I had not already stained. My case store will be installed at Old Cassino. There was plenty of productive activity occurring from those in attendance.  
 
Yesterday and today it has been raining, quite heavily at times, and it has prevented me from getting to the shed. Who knows, maybe tomorrow the rain will contract south and I will be able to spend some time doing a few tasks in the shed.
 
There seems to be a few people thinking along the same lines that I was about the Auscision 73 Class loco. There was much discussion at the Auscision faceplant page about DCC operation of the 73 class loco. That discussion prompted Auscision to provide the photo that shows the 73 Class undressed. I think I will be installing a decoder inside after gutting the light board. Actually, I think I will put two decoders in. The first will be an NCE N14SR decoder with 4 functions. I think I will connect up the front and rear headlights to the first two function outputs as standard, and then use the third for a cab light. I wire a cab light in all of my locos. I use it when a loco stops at a crossing loop on my layout, and the HO crew put the cab light on so the second person can exit the cab safely and undertake the safeworking procedures. I certainly don’t want any HO crew suing me for not providing a safe work environment. The second decoder will be 4 function only decoder, an FL4 from TCS. I will use it to wire up the marker lights. This will allow the front and rear marker lights (both red and white) to be controlled separately. That leaves me with a dilemma. How do I control the number board lights? Do I connect both front and rear to the 4th function of the NCE decoder, or wire them in parallel with the headlights. Ideally I actually need 9 functions, so I can control the front and rear number boards individually. But I’m not aware on any decoder (especially) a small one having more than 4 outputs. I’m not going to install three decoders in the 73 class. I could do away with my cab-light, but every one of my locos has a cab light installed.
 
So what are the other 73 class owners out there going to do when their 73 class arrives.

Sunday, January 20, 2013

Out Shopping

This week my son received his first desk on which to do his homework. It is certainly better than doing it lying on the floor as he has done in previous years. He put it together with a little help from Dad. Not bad for $19.00.   He also received a small stool to go with the desk. I tried the stool out and liked it so much I went and purchased three for the shed. I just wanted something to put under the layout and when someone needed to sit down and do some shunting at a location, they would bring it out from under the layout and sit on it. Mind you, it is not made for behemoths. But it looks like it will easily support my weight. As long as it is treated with kindness it should last for many a year. Not all my running crew weigh as much as I do. The seats cost $5.99 at Crazy Clarks.
 
One of the stools located next to Grafton yard.

I also popped into another Crazy Clarks store and found that they had a carton full of the one-step step ladders that I wanted a couple of weeks ago, but none of the shops that I visited had one. So I purchased 3 of them. I brought them home and set them up in the shed. They are about 3 inches higher than my home made steps, and the area on the top step is quite small. They are also slightly flexing when you stand on the top step. But I think they will work to allow the crew to get access to the top deck at South Brisbane Interstate and Park Road Sidings.

One of the new step ladders.
 
Last night I saw an update from Auscision Models about their 73 class Locos. So it is likely that my two will be in my hot little hands by the end of February. They do look very nice. I was concerned by what was not there in their updated description on the 73 Class page. There was no mention of DCC Ready, or DCC plug type. Someone must have been thinking the same as me and I see on their Facebook page, that someone asked the question if they were DCC Ready and Auscision replied that they have removed the DCC Plug from the model. They did WHAT! How do you remove a DCC Plug.  So these excellent looking locos are for the toy train types running DC, not the modellers running DCC.  To me that is absolute stupidity. If you couldn’t fit it in, remove the detail from the cab. Remove the working toilet or what ever else that is beyond reasonableness has been added to these in the first place. To me this is almost a Breach of Contract. Who sells locos in this day and age without a plug in it? I was thinking about cancelling my order and contemplating ripping them a new one if they decided to impose their standard fee for changing the order. Given that they have potentially made this loco useless now. The first thing I will do when I get mine, it pull it part, gut it, by most likely removing the whole main circuit board and see if there is room for a hard wired decoder.

Speaking of decoders, I spent some time today installing a decoder into a Bachmann Diesel for a fellow club member.  I then turned me attention to two of his steam locos.  Did I ever mention on this blog that I hate Pommy steam locos?  Again these two steam locos were Bachmann.  My God, when will this company learn to not electrically connect the drive wheels direct to the motor .  There is absolutely no space in either loco to install a decoder, without potentially gutting some of the weight, or the cab itself.

Today I took the time to add a few power jumpers to the track around where I installed the points last week.  I'm still one set of points short for getting everything working.  I think I might shout myself a run on the layout next Saturday to celebrate Australia Day.

A view of Acacia Ridge Yard.  The first track is narrow gauge, and the next one is track one in the yard.  You can see the crossover from track 1 to track 2.  Then you can see the cross over from track 3 to track 2 is only half in.  On the far outside of the narrow gauge track (centre right) is my KD height test track and the KD magnetic coupler test track in the middle foreground.
 
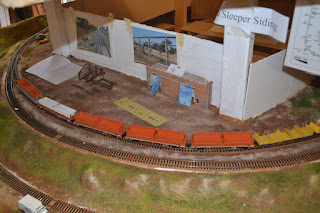
On the deck below we can see the Rocla Sleeper Train in that siding with my scratch built WSC wagons on the right, followed by the new Southern Rail model's NDHFs and one of my scratch built versions with their spoil bins.


Sunday, January 13, 2013

Thanks Lefty!

Saturday I headed over to the Local Hobby Shop (Austral Modelcraft) to pick up a set of NDHF wagons in the high strip fitted with Spoil Bins. I chose those as I think the high strip is just slightly better looking than the low strip which are both completely better than the ghastly yellow version. The bins were chosen as I don’t have any. I have previously scratch built myself about 7 of the NDHF for sleeper loads and I also had a Sydney Models vesion.  I had previously purchased a few Sydney Hobbies concrete sleeper loads as well as getting some made by a mate. I had also previously scratch built my own lot of individual concrete sleepers. They turned out pretty good. I made these from 0.080” square styrene - if I remember correctly.
 
Following that I made my way to the Club and while there sat at a workbench and got the wagons out and proceeded to fit KD#5’s that the Ray from Austral Modelcraft provided for me. I fitted the first KD#5 and encountered every issue that alanmack48 from Aus_Model_Rail Yahoo group had uncovered and documented on Tuesday 8th January. You needed to remove the front lip of the base of the KD box lid. Otherwise the KD#5 would not swivel. I just put the wagons away until I got home from the Club that night to perform some surgery on them. So I shaved down the front lip and then installed the KD#5. It was too low, but I persevered with #5’s on two wagons. I did this as I found 4 underset KD#27 couplers. These were fitted to the other two wagons. These worked out pretty good for height against my height gauge.
 
While at the Club I installed two drop in decoders for members on their new Christmas present locos and I received three locos to take home to hard wire decoders into over the next couple of weeks.
 
Today I went to the shed mid afternoon when the cricket was on.  It was about 36 degrees C outside and considerable warm in the shed.  I just had the fan on, but it was tolerable.  I installed three sets of points that I purchased off Lefty (Dave) on Tuesday night. These went between Acacia Ridge tracks 1 and 2. This now makes both of these tracks bi-directional and allows trains to cross here while travelling on the main line to and from South Brisbane.  I also installed one of the two sets of points to allow travel between track 2 and track 3.  I cut a piece of track the same size as the point I'm missing so it will be easy to install the missing point when I eventually pick one up.
 
Once this was done, I added my four new NDHF wagons to my sleeper train.  I also added one of my scratch built NDHF's to that train.  So it is sitting in the Rocla Sleeper Siding ready to return to Grafton when my timetable run resumes.
 
Because Lefty brought along alot of points to our last Tuesday Nighters meeting for one of the other attendees to paw through, I picked up three sets of points off him.  This allowed me to progress some of the tasks I needed to do before my next running Session.  So thanks Lefty!

Sunday, January 6, 2013

Coming Down off a High

After a solid two weeks of railway related activity, this week I have been winding down off of a high and I am currently finding it hard to get motivated. On Tuesday (New Year's Day) I got to the shed but only ran one train. I fixed the couplers on a 80 class that I had recently purchased. They were too high. But having checked out PK’s N-Tranced Dream Blog about his journey towards N scale shed heaven, following an update that he made on New Year’s Day night, I received one last spark of enthusiasm. PK had gone to Bunnings and picked up some shelves to store equipment from his old shed before it is demolished so he can then get his new Titan shed approved for his train layout – a complicated building approval process. These shelves also had a drawer attached.
 
So on Wednesday night after talking to PK at work during the day, I set myself the task of building a model of his shelving. Well I had already built some shelving similar a few weeks back so I knew what was involved. I took the finished item to work on Thursday to show off. The drawer even slides in and out with the help of tweezers.


PK's shelves that I have modelled.  Photo by PK.


My version complete with drawers.

Today I got down to the shed towards the end of the cricket. I ran a few more trains and progressed a few trains around the layout so everything was where it is supposed to be at 12 midday on the timetable. I replaced an old Bergs 49 class loco on a stock train with a new powerline 48 class. The 48 runs batter.  I also replaced the coupler on one end of the powerline 48 with a KD after the el-cheapo coupler had previously snapped off. No doubt that should be covered by warranty but why bother. I also did some maintenance on a WSC wagon that I scratchbuilt from styrene some time ago which had developed a bow. I re-straightened the wagon, heating it with steam and bending the wagon and running cold water over it to hopefully to re-learn the styrene what shape it should be in. I also adjusted the coupler heights on this wagon as they were too high. 
 
I then moved the train magnets from the North Coast Control Schematic diagram to where the trains are currently located on the layout. There are currently three trains currently in transit on the layout. The timetable cards are sitting on top the the trains. There are over 10 trains that have reached an interim stage in their diagram and are stowed in various sidings and loops on the layout, awaiting their return journey after being emptied or loaded. These are the wooden sleeper train at the Rocla Siding, a Stock train in the yard at Cassino along with the fruit express in the loop heading to Brisbane. In the Up Yard at Cassino is a short shunt train that has just returned from the Meatworks. At Kyogle in the yard is the rail train. At Old Cassino there is the ballast train stowed in the yard. At Murwillumbah, the cement train, the banana train and the pickup goods are all stowed in various sidings along with NL3 sitting in the platform. At South Brisbane we have NL1 sitting in the platform there and the CPH railmotor on an ARHS tour also in the yard. There were also a few wagons that were not correctly located in the correct sidings, so I manually adjusted them ready for the next session. However, after writing this I think I will wind the CPH railmotor back to where it is supposed to be in the timetable instead of its current dlocation in the South Brisbane Yard, the next time I visit the shed.