On Monday this week PK, Greg and myself caught the train up to Gympie North for a $0.50 fare. Then another $0.50 for the trip home. We took along our lunch, had lunch on the platform when we arrived and then caught that same train back again. A full-on day for about 6-7 hours on a train there and back and from my local station.
On the way home, there was an announcement on our train that we had to change tracks (over to the dual gauge) as a car had gone through a fence between Rocklea and Salisbury. This had stopped traffic on the lefthand track outbound, and caused disruptions as traffic had to cross over between lines, in between traffic coming the other way. So when our train went by, I took the picture below of the fence, but the car had been removed.
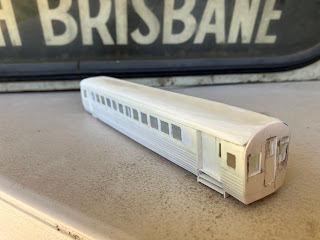
Most of the activity for the week revolved around continuing the build of the QR 2050 class railmotor. I had some requests from people to show some photos so I have a couple. I will also talk about how it was built. I started by finding the corrugated sides. I had some old AMRI corrugated styrene and it was just 140mm wide, the exact size of between the two side doors. So this was cut off and slightly bent. I then cut up some smaller length components for the sections before the front door and after the rear door (for both sides). I made a floor for the model, and then added some 1mm uprights and cross beams to make a basic frame for inside the model. To this frame, I added some 2mm styrene strip to the top and middle of the sides and 1mm strip to the bottom of the side to simulate the curvature of the railmotor sides towards the bottom.
The windows! I hate cutting them out and I glued a HO scale copy of the windows (from the plan) to a section of 0.5mm thick styrene sheet and when the glue dried, I started cutting out the windows. I had three sections here, the long section between the two doors with 12 windows and the sections in front of the front door and the section behind the rear door.
A frame was then made for the front cab. The cab shape was cut out by glueing a photo copy of the plan over some styrene, letting it dry and then cutting away.
The various carriage doors were cut to size and their internal windows cut in. These were the front door, rear door and the side doors. I still have to make a door for between the passenger compartment and the luggage space. Maybe tomorrow.
The stairs below the side doors at the rear were added and they look OK. I think they need a rear backing on them which I have not yet added. But again a simple task for maybe tomorrow.
The front cow catcher is going to be a tricky job. I have not yet started to cut this up but I have some ideas.
Friday was drinks at work. We put away 110 coronas between us all. A great night.
Saturday was the Redlands Model Railway Exhibition. I was working on the NMRA stand there with a few others and had many great conversations with the public and members. I was showing off my railmotor but the main task for the day was to cut out the rear section of the Cassino Station building. When I say cut out, it means cut out the doors and windows in a section of Slaters Brick sheet with the correct brick pattern for the building. I also cut out the two ends as well.
Today I continued on that path. I cut the windows in the old station master’s office end of the station buildings and then cut out the windows and doors for the main platform side of the station buildings. I then added the double thickness for the brick pillars that will support the station awning brackets. On Monday this week, Greg handed over 50 of his 3D printed awning brackets that I will need to paint and I will fit this next weekend. More progress this afternoon, has meant that the internal walls were installed and the various internal vestibules into the toilets have been installed.
More work next weekend will be to paint the doors and windows and install them. I might have to make some templates for the various windows and see if my 3D mate (hint hint) could perhaps print them from an initial scan like he did for the awning brackets.
So I’m back at work next week for a few days, so that will limit my building activity. I also need to build up a few more power supplies (for layout lights) as some of my mates want one. I also need to do some research for Bob on a sound module and look for some very small bogie mount low revolution motors to power my railmotor and a few other railmotors that are in production (or soon will be) around the traps.


Good to see you making excellent use of the 50 cent fares. The pictures of the railmotor, and Cassino station are great.
ReplyDelete