Sunday, April 25, 2010

Lots of Little Jobs

On Friday night this week I headed to the local Model Railway Buy and Sell.  I tried to sell off some of my stuff and got no nibbles at all.  However all was not lost.  Bargin with a capital B!  As usual I spent more than I earned.  I picked up 10 new lengths of track for $15 to be used in some sidings, a small book, 2 level crossing lights for $8 and an unpainted 3 pack well wagon set missing one of the intermediate bogies for $5.  That is correct - $5.

Saturday rolls around so I decide to do a few  little jobs.  I previously purchased (years ago) 2 x Cornerstone kits for EMD 567 engines.  So I assembled them.  They look quite good and will be loads in some open wagons.  As a by product of assembly there was some bits of sprew that looked just like household gas cylinders.  So while watching TV I filed then flat on the bottom, cleaned then up and filed them to shape and now I have 10 x 4.5kg gas bottles for the layout. - Hey, who else has 4.5kg gas cylinders as detail parts?  Mind you I don't have any BBQ's for them to be used on yet - but I think that is a project for another day.

A few months back now, my mate PK made a number of purchases from OS on ebay.  One of these was some fancy wrought iron fencing with big concrete looking posts from China in both HO and N scale.  He previously donate some of these to the Club.  2 weeks ago, while working on the Club HO exhibition layout I decided to start installing a bit of fencing around the local cemetery and the Church carpark.  I used the N scale fencing.  I brought a packet home and on Saturday proceeded to drill holes up the posts so I can insert some wire that will be used to anchor it to the ground. I think I must have drilled out about 20 posts.  Monday, on the public holiday I am heading to the Club to finish off the fencing.

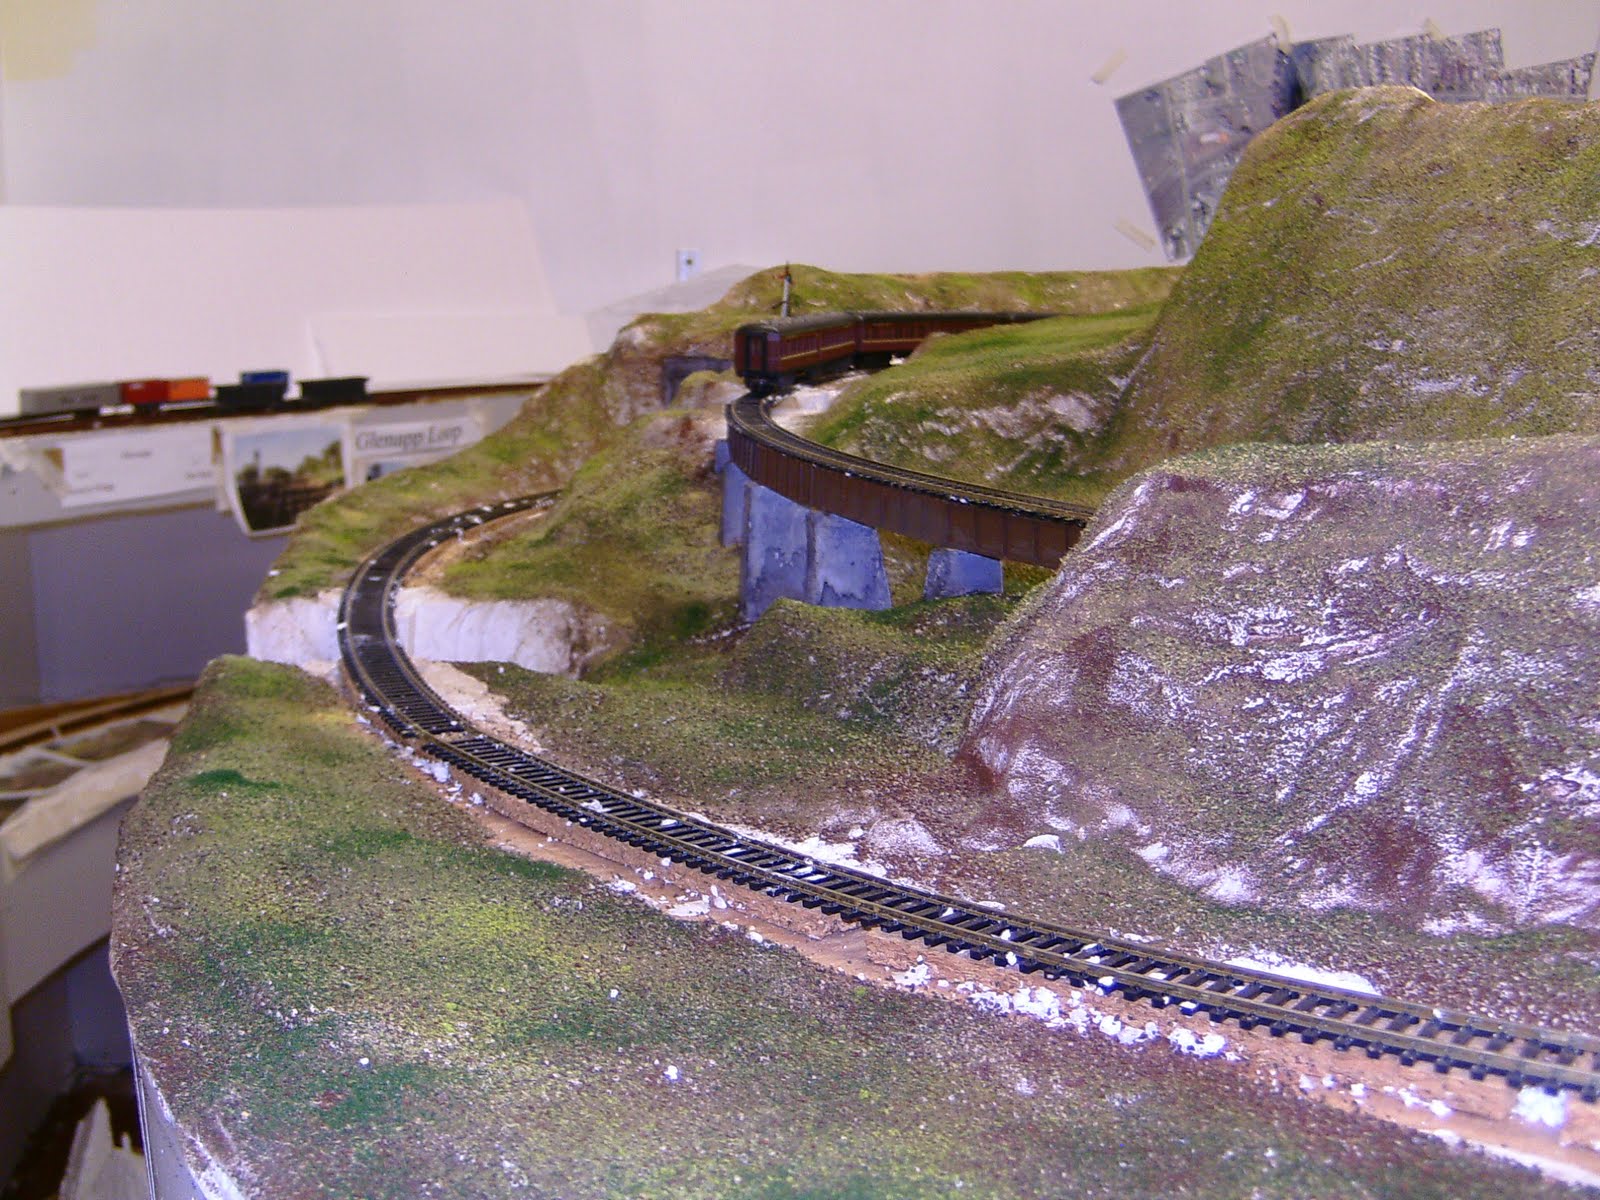
The dead centre of town - new activity on the top right - photo by PK

Saturday night I decided to make the new 3 pack well wagon set operational.  A search of the shed found a similar bogie to the missing one, on a NSW CCX wagon sitting in the repair siding.  This wagon was there because it was too light and kept derailing.  I plan to replace the bogies on this wagon with AR kits or some other brand in the near future.  It is hoped the added weight of these brass bogies will allow the wagon to return to traffic.  The bogie under the CCX wagon while of the correct type had larger diameter wheels.  However, a search of my other spare bogie collection found a different bogie with the correct diameter wheels.  A quick swap over and voila!  A pair of bogies for the 3 pack.  Well I also had to throw in a single KD and the wagon was now runnable. 

At the same time I also assembled an American well wagon that I'm passing off as Australian that was languishing near Acacia Ridge yard following painted last year with wheels not yet refitted.  I added KD's and screwed the wheels in, and another wagon was now ready to return to traffic.  This wagon will go at the rear of one of my container trains. 

This morning I cut up some styrene I-Beam fencing (0.060") and drilled 5 holes in each of the 66 pieces I cut up.  After lunch these were painted a brown rusty and yesterday's completed 3 pack well wagon was painted grey and 6 pieces of concrete sleeper loads from Sydney Hobbies painted white. 

The three pack well wagon sitting in Fairy Hill siding with containers fitted

This weekend I have also started to get my things together for next weekend.  Next weekend  is the Brisbane Model Train Exhibition weekend.  I will be working on the Structure Building Stand on the Saturday and Sunday only as I fly off to Sydney with work on the Monday for the week.  So if you are in Brisbane say hi to me at the stand.

Tomorrow as I have said I'm off to the Club to help finish off the HO exhibition layout.  It needs some fencing done, around the cemetery and the car park and along the railway line.  I also might do some work on the oil siding.

Sunday, April 18, 2010

Top Deck Scenicing Progresses

Yesterday afternoon and this morning I spent some time achieving this weekends goals.  Saturday was to complete the plastering around Cougal Spiral between the track and the edge of the baseboard - the facia.  This was completed and left to dry overnight.  This morning I sceniced the still white (plastered) area around Cougal Spiral south to the area adjacent to the Kyogle Stock Siding, which is just before the Upper Richmond River crossing at Kyogle.

I still have the dry creek area of Cougal Spiral to scenic and the bridge piers themselves on the bottom circuit.  I have not installed the bridge here so don't know what I will do yet so I have left it for another day.  You can see the white of the ravine area in the first two photos either side of  the creek area still to be sceniced.

Looking south of Cougal Spiral

Looking north around the Spiral - looks like a train of TAMs has just gone through

Looking south of Cougal Spiral showing Kyogle Stock Siding - a mixed stock train is sitting there

This afternoon after the kids and us oldies came back from a school birthday party, I just had to relax in the shed.  I decided to run a few light engines around and cleaned the track around where I had been scenicing.  The trains included 6042, 3642, and a number of 44's.

While listening to the second half of the football on the radio I tried to use my camera to take a video - two actually, of the layout. Both were of 2 sound equiped 44 Class locos hauling a train of scratchbuilt wagons.  A coupled pair of rail wagons and about 8 or 9 concrete sleeper wagons with loads.  The first video was the train leaving from Grafton Yard up grade to Rappville Loop.  After the staff exchange, the train continued in the second video north to Cassino for another staff exchange and then around to Old Cassino.  These videos are not the best quality but are hugh at about 46MB .avi files.  That is far too huge to upload onto my blog. 

I was wanting to show some video of a train running on the layout.  Well I guess that will still have to wait for another time.

Sunday, April 11, 2010

Sunday Update

This morning my son and I made our way over to the NMRA Model Railway Exhibition at the Mt Gravatt Showgrounds.  Upon arrival I was met with many friendly known faces.  There was about a dozen layouts in attendance.  But by far the best layout there in terms of modelling detail, accuracy to realism, things for the kids to see, various animations and sheer simplicity was Broxburn Sidings by Ron Everingham.  Ron is a fantastic modeller and this layout can hold its own against almost any exhibition layout around in Australia. 

The animals (cows, horses, kangaroosters, camels) and a working oil pump

Various QR branded item of rollingstock on Broxburn Sidings
Ron has been modelling QR or Quentin River as he calls it for what must be over 20 years now.  His layouts keep getting better and better. 

On the way home from the Exhibition we stopped off at the Silkwood Mauraders residence to see the shed progress.  Apparently wiring will be complete mid this week and David needs to complete the plastering.  This will be followed by the painting.  There is still no sign of his own Blog!

The far end

The entry end of the shed with sliding glass door

Upon return home, I completed the last two bridge girders for Cougal Spiral.  I purchased some styrene from Austral Modelcrat yesterday morning and acquired one of Raymond Mewes today.  I only needed one strip of both.  These girders were painted and installed on the layout.  I also removed the formwork from the bridge piers on the bottom bridge on the lower level of the Spiral.  I also fixed the layout facia on this area and cut its profile to the basic ground contours with my trusty snap off blade knife.  Next week I plan to complete the plastering of this area up to the new facia and may even do the scenery from the track to the facia as well.  We will see.  At least I have a list of things to do.

As I am progressing, it just means I am getting closer to the Upper Richmond River Bridge at Kyogle and to the Kyogle township itself.  Kyogle will require a new basebaord to be affixed to the frame that will be about 5 feet long and 18 inches deep, so I can actually build a small residential area in behind the station precinct.  This area will allow a local road to be installed in front of the houses and will have a few derelict buildings and a few commercial ones as well.  I have toured this area with Google Maps so I can pick out some features I like.  It is great from the road view going from house to house seeing what is on each side of the road. 

The tools we modern modellers have at our disposal is just brilliant.  It sures beats having to drive 2 and a half hours there, take some photos and drive two and a half house back and realise that you forgot to photograph something.

Saturday Update

Saturday started off with a visit to Austral Modelcraft at Mt Gravatt.  It was there I ran into the Shed wannerbies, the Mewes' and also 3 guys down from Toowoomba.  The Toowoomba Guys from the Darling Downs Model Railway Club came down to Brisbane to attend the NMRA Exhibiiton on at the Mt Gravatt showgrounds, and then check out two hobby shops - Austral Modelcraft and Horizon Hobbies at Warner. So I said drop in to our Club. About 10 minutes after my approximate 40 minute drive across town from the hobbyshop, the Toowoomba guys got to the Club and renewed a few acquaintences with our members and had a look around. This was these DDMRC guys first visit to the Clubrooms.

However the aim of the day at the Club was to work on the Club layouts in preparation tfor the AMRA Model Railway Show on the 1st -3rd May at the Brisbane Exhibition grounds.  Simultaneously we are working on the HO and N scale layouts.  So the usual meeting area of the Club has been taken over by the two layouts.  Both layouts are coming along very nicely. The quality of some of the buildings and scenery on both layouts is just mind blowing.  I am sure that people will not know the layouts from their first appearance last year as they were both pretty bare.


On the HO layout, there is a new addition to the Austeel Shed area. It is a Film Canister. I have no idea what it is, but it seems that the film canister makes many a modern magazine article, so it must be hip to contemporary Australian modelling. So we now have one on the Club Layout. I'm sure a number of the Tuesday Nighters will be rushing to install one on their layouts as well as these guys are pretty switched on modellers. Being never one to mis a fad, of course there is already one on Cassino at Fairy Hill Loop. This is in the guise of a concrete water tank with a top on it.  The Tuesday Nighters crew already knew about this.

Austeel Shed's office and carpark with the new addition to the scenery - photo by PK

Monday, April 5, 2010

Greener Pastures

Today the hobby shop was not opened.  Bugger so no styrene to complete the bridge. What has happened to these open 7 days shops!

This morning started off with a few emails from the Silkwood Connection.  Mr Mewes had spent some time over the last few days installing insulation in his shed.  About time, but it is great to see him making progress.  I think the shed has been up for over 12 months now.

Here is a photo of his shed taken by Dave yesterday.  We've been onto Dave and Raymond to start their own blog but they has not yet - maybe this will motivate them.  Dave moved to the dark side some years back.  He was a NSW HO modeller but moved to O scale narrow gauge.  Raymond has no side - He models anything and everything.

The Mewes' Shed being insulated before being plastered

That reminds me we have not heard much from Gary about his shed down south of Sydney!  Hint Hint!

So today, I turned my attention to spreading a bit of greenery around Cougal Spiral.  The area from Border Loop heading south was attacked in 5 small sections.  I did try and conscript an apprentice to help but Geoff was having some well earned family time.  Maybe next time.

Border Loop is through the top tunnel portal

Cougal Spiral looking south - the bottom tunnel portal track appears on the right eventually

The Bridge

I also used inkpad ink diluted in metho to do a first cut stain of the 6 piers and the two tunnel mouths at Cougal Spiral.  I also stained the tunnel mouth at the Border Loop end of the tunnel as well.

Also below is my first section of 12mm track in Acacia Ridge Yard that will allow me to run QR trains next to NSW trains.  The outer track is 12mm and further to the left around the retuen loop it will become dual gauge to travel north of The Ridge in a few years time.  Geoff donated the 12mm track - thanks mate.  I now need a few sets of points, another dozen more lengths of track, followed by a loco and wagon or two to complete the scene for my initial dabble in 12mm.  I will then be able to shunt back and forwards around the yard.

C ya next week.

Sunday, April 4, 2010

More Bridge Works

On Thursday at work, PK asked me to deliver some packets of styrene to old Mike. So on Good Friday I went around for a visit and made the exchange. That man is just amazing! He has built another HO layout and scratch built some very simple buildings and structures. They look very good. He also had a couple of small wooden boats that he gave me, as well as a couple of structures - one HO and N scale for our club layouts. I'm sure one of our N scalers is going to have an absolute ball putting the N scale station building together. Thanks Mike!

This Saturday I decided to visit the local hobby shop and pick up a few more decoders for the Club Shop.  I also had a good look through their rather extensive Evergreen styrene collection. They had no 0.060" angle styrene which I was to use for the virtical webs on the girders I'm constructing over Cougal Spiral. I thought I will have just enough left at home so this should not be an issue. They did have a packet of 0.080" angle sytrene which I decided not to get it as I also thought I had enough of that size. The 0.080" styrene is used along the top and bottom plates for the girder. It turned out that I could do 4 girders with the 0.080" before it ran out. Bugger! I also got about a quarter of the way through the fourth girder with the 0.060" before it too ran out. Double Bugger! No shops open today and no guarantee that they will have any anyway. Tomorrow I will travel over to the only shop likely to be open on the southside of Brisbane that has styrene and I will pay an exorbitant amount for another packet of 0.060" and 0.080" angle that I need to complete my bridge. Serves me right as I should have picked up the packet of 0.080" angle on Saturday.

In the mean time, I painted the first three complete girders with a can of redish brown spray paint that I had laying around.  Unfortunately I think it is now empty.  What's the bet the next two girder will end up a different colour and everyone who looks at my bridge will ask why are those two girders a different colour!  Oh I get myself into some messes.

The 3.25 girders from top to bottom, left to right area #4, #3, #2 and #1.

I think the girders fit in quite well into the scene, even if the area I'm photographing is a low light area, so you can't see the detail on the girders.  If I was to use a flash, the picture gets all washed out.  So I can't win here either.
The first three girder in place - sorry for the dull photo - contrast needs adjusting

I have also built some balsa form work around the base of the bottom bridge at Cougal Spiral. Monday afternoon I plan to conduct the plaster pour. Damn workers demanding triple time on Sunday to do the pour then, so it was delayed until Monday as this is only double time rates.  At this stage I'm not sure if I will build the girder to do on the plaster piers on the bottom bridge or I will buy one. We'll see what turns up tomorrow at the hobby shop.

Balsa form work for the bottom bridge

Well I got my camera working again. It was absolutley amazing. If you put new batteries in it, it just seems to work. It's like - Magic! Doh! My wife made me feel very small when she suggested I replace the batteries. Don't be silly dear it's kaput! But to humour the dear wife, I did it and damn it worked. Wife 1 - Husband 4115. But we all know they don't count.