Sunday, May 31, 2020

Distracted by a Camera Flash

This week my modelling activities were distracted by a camera flash, at least on Tuesday, Wednesday and Thursday nights.  I wanted to model a TW taking photos on my layout.  I thought that this modelling project would be easy.  The first thing I did was to talk to Barnacle Bob and see what he used on his layout.  Mosquito Creek has a photographer supposedly taking a photo of a young lady sitting on a rocky outcroft, when we know he is taking a photo of a train crossing the brilliantly built trestle bridge with a train running across it.  So Bob’s solution was to purchase a WEISSMANN model.  In the current environment, that would cost truck loads from Europe to ship and conversion rates would send me broke.  Surely I could manufacture one myself.  I thought about using an NCE Mini Panel to send a signal to turn on an NCE light-it wait ¼ of a second and then turn it off.  My issues is that when I issue a turn it on command to a light-it it is a slow turn on. The intensity of the light ramps up over a second.  Not an instantaneous ‘on’ like a flash from a camera.  I was going to detect the presence of a loco on a section of track and via an NCE BD20 and then that would trigger a function on the mini panel, which would activate the light-it sequence.  I thought this would be easy, but the cost of a BD20 was a slight stumbling block in my current modelling budget and the slow turn on was the real killer.  I think I might have some 3rd party detectors in the cupboard that I might try and see if they could trigger a Mini Panel input, in place of the NCE BD20, but this solution looks dead and buried, especially when the turn on from the light-it is rather a slow ramp up – not a simulated camera flash.

I had another solution.  It was that the loco on the track itself would just trigger power through a bridge rectifier to light an LED.  I have set it up so this solution works and will only trigger on a powered axle, not each axle in a train.  This is achieved by having isolated sections longer than a wheel tread before and after the section connected to the bridge rectifier.  So in a test run, my 6 wheel loco will fire off the camera 6 times, once for each powered wheelset.  The flash was quick to fire and then went out.  A contributor to this short flash, is that the section of track that is the trigger section is only about 4mm long and the wheel on a moving train is quickly on and then off the trigger.  Sure a certified TW might take than many photos in quick succession for each locomotive, but, ideally I’d like the circuit to fire maybe once or even twice for each loco – maybe once per bogie.  So I’d like the first wheel to fire the camera, and then it would then charge a circuit that introduces a delay of maybe 2 to 4 seconds before it resets.  That way the camera will fire maybe once per bogie or even once per locomotive, depending upon the speed it is going through the section.  Alternatively, the first wheel might charge the circuit, which then the second or maybe third or fourth wheel will initiate a camera flash, as the other wheels contribute to the charge.

I need the help of an electronics guru.  I really don’t want to spend $50 - $100 on a commercial product.  Surely there are lots of people who would like this gimmick on their layouts.  My circuit diagrams are below.

The other activities undertaken this weekend was watch the NMRA-X event on Saturday night for a few hours before I bailed.  I have almost completed a presentation for an upcoming NMRA-X event.  I built 26 more pallets and have 12 that been painted and added to the spares box.

I did revert to doing a little work on my QR HO wagons by adding a small amount of weight between the centre sills on the first two completed wagons.  Maybe next week I will do some more on my 4 half bit QR HO wagons and maybe they will enter the paint shop as well.

Sunday, May 24, 2020

Too Cold to Model

Well this weekend I crawled out of bed on a cold Saturday morning and made my way over to Ray’s to pick up some strip styrene.  I availed myself to 9 packets and was still missing three others that I wanted.  So I happened to then visit George and he was missing the same three packets.  It is likely that I had previously cleaned out these sizes at both shops.  I could have visited Raymond, but did not want to disturb him and I will probably only have to wait one week, as I will try again next weekend.  There are some other packets I need to pick up to replenish my supplies and George is also getting a shipment in early this week.

When I got home, I could not get motivated to continue on with modelling the QR HO wagons I started last weekend.  So that activity will be put on the back burner until next weekend.

I did however, do a bit of work on a future article on Railway Operations for AMRM.  Today I continued along this theme and I also did some ground work today on what could be another 12 follow up subjects, if there is any interest following the first two articles.  Some of these subjects are quite simple and would likely be pretty small, but some of the others will be quite involved.

Last Tuesday a few of the Tuesday Nighters got together online and were joined by Marty.  He was on my back for another future presentation for the NMRA-X live streams in the future.  I had a think and I could actually do another presentation.  I’m not sure that the presentation will run for an hour, but may well do for 30 minutes and have some question and answers afterwards.  I have started putting together an initial PowerPoint presentation.  Actually the reason I tried to pick up some of the styrene packets on Saturday morning (4 packets actually) was because I was going to make something in and for my presentation and wanted to record a photo diary of construction in my presentation.  So that activity will also not be until next weekend at the earliest.

Sunday, May 17, 2020

QR HO HOn3½ Wagons


This week I did do some more work on my QR HO wagon.  The side bracing was added to the second wagons and bogies added.

I also got my spy camera out (I’ve had it for 3 weeks tomorrow) and got around to charging it and gave it a very quick test run.  The instructions that came with it were undecipherable and luckily I then found a YouTube video on its operation and an English version of the camera’s manual online.  The camera was OK.  It can even be used as a webcam.  Not bad for something worth $13 + change.  I am thinking that I might need to buy another one so I can just keep one down the shed and one with my laptop for when I want a second view on something when I do an online meeting.

On Friday I visited what was my local hobby shop.  It was Simon’s last day of trading from the store.  I went in and there was practically nothing left.  He had sold it all off.  No styrene, no paint.  That was what I went down to buy.  But what I left with was a styrene stand.  I really have no room in the shed to house it, but I know someone with a larger styrene collection than me who has a shed just as big and could use it.  If he didn’t want it, I was going to pull the stand apart and put all my styrene on one of the sides and attach it to a wall in the shed.  I think I’d go close to filling up one side in the number of packets I have.  However, Raymond and Lefty accepted the stand, and they now have it in their shed.  They can put magazines in the end slots used for various types of styrene sheets.  The other side they could use for bogies, detail items, and other nick-knacks that they have to allow them to put things on display.
Raymond's styrene stand.  One side completely full.  I did send him an email and told him that the packets start at the top and are fed behind the next row, so you can see all the packet numbers.  Photo by "& Son".

Magazines stored in the end of the display.  Photo by "& Son".

More styrene on the other side.  Photo by "& Son".

Saturday afternoon I participated in a Zoom meeting of 15 guys from the local NMRA division, and one from across the ditch.  That was a great meeting and the first of many if the local superintendent gets his way.  That will be great.  Later that night I attended the NMRA 12 hour session which was started off by two Australian presenters.  I particularly wanted to see the first session on signalling.  It was very disappointing that the video footage was very stuttery and lots of vision was missed when it caught up. 

Today I have spent some more time on my QR HO wagons.  The second wagon was completed but didn’t get sent over to the paint shop as planned.  KD coupling have been added, as well as end wagon detail.  On this version I also added the door detail which I did not put on the first wagon.  I may eventually go back and add that, but I’m in no rush.  I then started cutting out the next three QR HO wagons.  Well 3 turned out into 4 more.  Two will have the doors removed and two will have the doors still on.  With the components cut out, I thought I might then assemble the top of those wagons.  So that has now been completed.  I think all of the wagons need a small amount of weight added to the centre sill to help them stay on the track better. 
My first QR HO wagon.  The light does not do it justice.
 
The second one completed and ready for the paint shop next Sunday.

The next 4 QR HO wagons still requiring external detail and under floor detail.  That is next Saturday's job.

Next week, on Saturday I will be added the centre sill and the bolster for the bogies.  I then add the end detail and the side detail, along with the doors on two wagons.  I feel Sunday will be paint shop day.  I will then add some lead to the centre sill and then have another 6 completed 12mm wagons for my narrow gauge collection.

Quite a quick and easy process that has worked out costing not much money at all for 6 new wagons in the roster.
Last week I also put together a small test track for 12mm wagons.

Sunday, May 10, 2020

Tying Up Some Loose Ends


On Monday this week, with it being a public holiday,  I got stuck into doing some work on some more 12mm scratch built QR HO wagons – that being the wagon code as well as the scale.  The second QR HO wagon is almost completed.  Today I added some finishing touches to the first wagon, including couplers.  I then gave it a good spray of a base grey colour to start with, followed by a weathering coat of brown, black and yellowish grime over the top.  I am quite happy with the results.  I hope to complete the second wagon later this week, and potentially start on three more as well.

Yesterday evening I decided to spend some time in the Shed improving the Control Panel for Acacia Ridge Yard.  This control panel has been usable for years, but has had some pencil lines drawn on it to represent the various tracks.  This has now been upgraded to lettering tape to represent the various tracks, colour coded black, blue and red, to represent the mainline, loop line and sidings.  The DCC accessory addresses for each of the electrified points controlled from the panel have been added to the point locations so someone can manually enter those addresses is required.

Just after lunch today I decided to make a small portable 12mm test track with a coupler gauge on one end.  That used a couple of pieces of 12mm offcuts I had lying around was quickly completed.

The other things I have been doing since Friday evening is working on completing some modelling articles for AMRM.  I had a number of articles in various stages of completeness for quite some time.  I was very lazy in not completing these sooner.  I sent one off already today and maybe by early next week another two will also be sent off.  Hopefully they will be of use to them.

Bit by bit, as has been occurring this weekend, I hope to start crossing some more of the tasks off of my to do list.  After these next few narrow gauge QR wagons are completed, I will resume work on the Kyogle station building.  I also keep looking at a number of items that were being made in a large group, with only a few being complete.  I must return back to completing these items.  There are plenty more in the same boat.

I also have remembered my YouTube password, but have been too busy with other tasks to put any video up.  I will advise when I post some video to that site.

Sunday, May 3, 2020

More on Yesterday's WifiTrax WFD-30 Installation


Yesterday afternoon I took my WifiTrax WFD-30 NCE Cab Bus Wi-Fi Interface installation to the next level.  So I found an old Telstra cable modem in my office that has no use as we are on NBN.  I plugged it in and it came to life.  I found the manual online and had to work out how to reset it as I had changed the admin password quite a number of years back and I had no idea what I had changed it to.  Everyone does that right?  So I reset the modem, logged on and set about changing a few things.  I renamed the SSID (the wifi network address that the modem advertises to the world) to something related to my layout.  I then set a password so only invited guests will have access.  Don’t want those pesky neighbours trying to break into my shed wifi to run my trains when I’m not in the shed.  I tested logging in with my phone and laptop and everything worked well.  I then tried to change the WFD-30 WiFi Interface to log into ‘Home Net’ mode.  So I set the SSID and password and clicked Install in the WFD-30 web panels.  You do know it does help when you RTFM (otherwise it would not be called the fancy manual in the first place).  I rebooted the NCE system, and the now train shed’s wifi modem and then I had my phone log back into the shed wifi.  I selected a loco and bugger me, the horn worked on a couple of locos.   I might be able to get a job as plumber after all.  It seems now that the WFD-30 NCE Cab Bus Wi-Fi Interface is now in ‘Home Net’ mode.  I just need a Tuesday Nighter’s meeting at my place so everyone present with a smart phone can log in and we can determine how many we can load up on wifi in the shed.

Anyway today PK wanted some pictures.  So I thought I had better get some and do some more tests.  If I only power the WFD-30 on and not the modem, it seems that my phone connected to the WFD-30 network and I could still control a train via that network.  If I then powered the modem on and disconnected from the WFD-30 network, I could connect to the shed’s new wifi modem network, but Engine driver would not connect to the WFD-30 via the shed network.  If the modem comes up before the WFD-30, then the engine driver app will automatically connect to the shed wifi and I can run a train via the ‘Home Net’ mode.
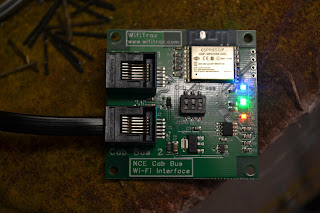
This is the WifiTrax WFD-30 NCE Cab Bus Wi-Fi Interface straight out of the packaging.

Attach it to the cab bus, and it starts to light up.  Red says that the device has power.  Blue says that the command station is polling the address of the device.

I get my trusty $29 phone out and check for networks in the shed.  The top one is what the WFD-30 advertises.  I connect to it via Engine Driver and I can run a train.

As soon as I connect to the device via wifi, the green LED lights.  This LED has two modes.  When a device is connected to the WFD-30 directly, the Green LED will flash when information is sent via the wifi network.  When a device is connected via the Home Net mode, the green LED is continually lit.

This photo shows that the shed Wifi network has been enabled and phone has connected to the Home-net.

While in the shed yesterday I noticed that two of the new 12mm sidings in Clapham Yard did not have wiring to the track bus, so I could not use them.  I must have forgotten to do that when I installed them.  I was also having a short in the Cougal Spiral to Acacia Ridge Section.  I scanned the track and wondered if it was a particular narrow gauge point, that I might have bumped yesterday.  I changed the direction of the set of points and the short disappeared.  Being a 12mm Peco point, it is an Electrofrog point.  It has the wire connected to the point frog for powering.  I never bother to connect these wires up.  What I normally do is feed the wire back under the point and then it is out of the way.  I had another look at this point and the wire connected to the frog.  I pulled the wire back out and just let it hang there and then I changed the point again.  This time there was no short.  It appears that the wire to the frog, had worked its way out and was touching one of the stock rails, so when the point was changed to the other direction, it was connecting both stock rails to the frog.  Well at least I found and solved the issue.  It is all good now.  I also added the droppers to the two Clapham Yard sidings and the new siding I added to Acacia Ridge Yard and then ran a 1720 back and forth in all the areas to confirm it is all workable.  All Good.

Tomorrow I hope to eventually get to what I was planning to do over the last 2 weeks and I have still yet to start.  However, given that I also picked up a 10 pack of 12mm bogies at the hobby shop yesterday, I might resume my task of scratch building some steel 12mm wagons.  I have one almost complete and I should be able to complete the second tomorrow as well.  I also have another task to add to the 'To Do' list.  It is to build a 12mm wagon to place my new camera on so I can get some footage of the 12 mm track. This will be a driver's eye view of the layout.  I also have to try and remember my YouTube password, so I can upload some footage so I can then share the links.

Saturday, May 2, 2020

WifiTrax WFD-30 NCE Cab Bus Wi-Fi Interface


I came home from the local hobby shop this morning after purchasing a WifiTrax WFD-30 NCE Cab Bus Wi-Fi Interface.  I unpacked the device and plugged the WifiTrax into my cab bus, turned on my NCE 5 Amp system system and the WifiTrax device lit up.  I grabbed my dedicated engine driver $29 phone.  Found the network that the WifiTrax was advertising on and connected to it.  I started engine driver application on my android phone, selected a loco sitting on a siding and OMG the loco ran, the head light went on/off, the brakes function worked, the horned sounded.  It horn continually sounded like someone was having some sort fit.  I was.  It could not have been any simpler.  Give the creator of this device a medal.  It is magic.  It is fantastic.  Every NCE owner should get one.  George was selling them for $150.  I took his last one.

This initial setup means that I am now limited to 4 wifi throttles using this product on the layout, without having to use my Raspberry Pi.  So I will read the full manual for the WifiTrax later today/tomorrow and look at setting it up on a wifi network in the shed and then I can have a lot more throttles apparently.  

So it now looks like I can cart this device along to any of my mate’s layouts and connect it to their cab bus and they will have a wifi enabled setup.  So when the current Covid-19 lockdown is over, I could visit Darren, Anthony, Lefty, Cliff, Geoff, Jeff or anyone else also with an NCE system and a vacant valid address available and then they can also have a wifi equipped layout.

How good is that?  Pretty Damn good if you ask me.